
It is a very unusual occurrence for a tree to become ill. If you are one of the unfortunate people who is wondering how to save a dying tree, you are one of the unlucky people; nonetheless, it is not a game of chance. The vast majority of trees are able to fend off diseases, issues caused by insects, and extreme weather conditions once they have become established and grown.
However, once a tree's health has been affected, it becomes subject to all of the aforementioned concerns; therefore, it is imperative that action be taken as quickly as possible. They will assist you in determining the nature of the issue and will suggest a few measures that may be taken to bring your tree's health back to its previous state.
First and foremost, you need to establish beyond a reasonable doubt that your tree is passing away. The symptoms of a dying tree are listed below in this part to assist you in determining whether or not there is a problem. Second, you have to zero in on the specific nature of the issue. It's possible that simply following the broad instructions in this section will be enough to give the tree the power it needs to fight off its disease. On other occasions, you will be required to carry out a certain set of actions, which we will detail below.
These may involve the use of pesticides, the addition of macronutrients to the soil, or something else else. In the most dire of circumstances, you could seek the advice of an experienced arborist.
7 Signs Your Tree Is Dying
Trees are an important component of every beautiful environment. These towering plants not only contribute to the aesthetic value of the environment, but they also provide protection from the sun and shade for animals and other plants. There are times when it is clear that a tree is on its way out, such as when its leaves turn brown in the summer or when its limbs become riddled with holes caused by wood-boring beetles. However, it is not always easy to tell when trees are in bad health, which makes it challenging to take action, particularly when a tree that is either dead or dying is situated close to a building or a residence. Broken branches falling from a diseased tree have the potential to injure people as well as animals, and they can result in expensive repairs if they land on a building or a vehicle. Keep an eye out for these seven symptoms that could indicate that you have a tree on your property that is on its way out so that you can take care of it before it does any damage.
The Tree Has Brown And Brittle Bark Or Cracks.
When a tree is nearing the end of its life, its bark will become loose and eventually fall off. Additionally, the bark of the tree can be peeling away or there might be vertical fissures. "Check for deep splits in the bark that extend into the wood of the tree or internal or external cavities," advises Matt Schaefer, a Certified Arborist with The Davey Tree Expert Company, which is the largest residential tree care company in North America and the first tree care company in the United States. The Davey Tree Expert Company is also the first tree care company in the United States. Cracks are a common source of weakness, which can make a structure more susceptible to destruction in the case of a storm or other severe weather event. Worrying about tree removal? Then, Tree Amigos tree removal solution is the right choice!
There Are Few Healthy Leaves Left.
In deciduous trees, you should be on the lookout for branches that don't have lush green leaves but instead reveal leaves that are brown and brittle during the growth season. In addition, they will have dead leaves that are still hanging to the tree well into the winter, rather than falling to the ground. When a coniferous evergreen tree is under stress or is about to die, the needles or leaves will turn colours such as red, brown, or yellow.
The Tree Has An Abundance Of Deadwood.
It is not necessary that you have a tree that is dying just because it has a few dead branches or pieces of wood. (To maintain the health and vitality of your trees, it is important to adhere to a routine trimming programme during the dormant season.) The presence of a greater number of dead branches, on the other hand, can suggest that the tree is unhealthy or on its way out. Schaefer issues the following warning: "Dead trees and branches could collapse at any time." This presents the possibility of a risk to both you and your property.
It's A Host To Critters And Fungus.
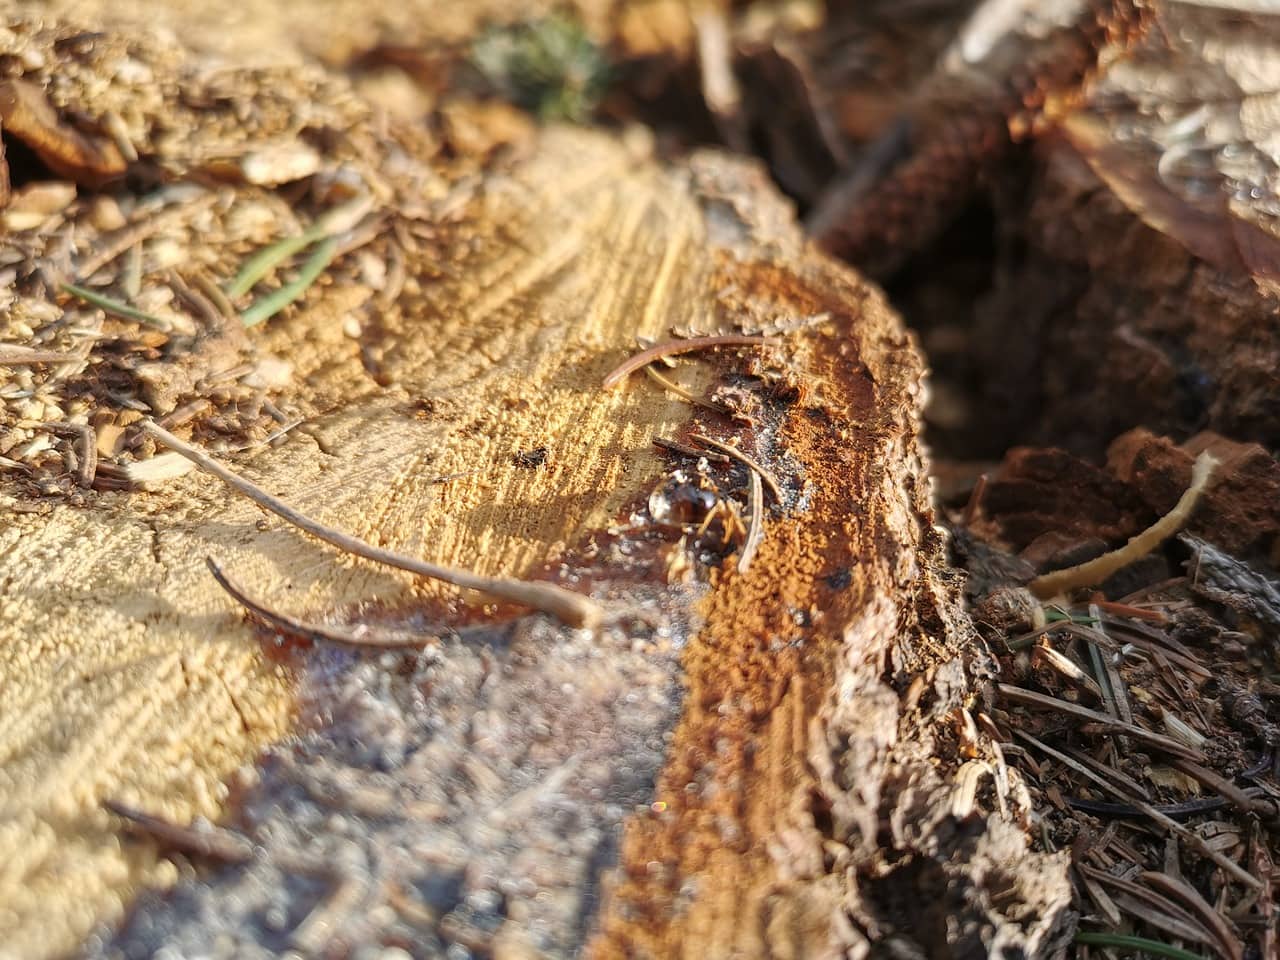
Pests such as bark beetles and carpenter ants make their homes in trees that are either struggling to survive or are in the process of passing away. These parasites favour hosts that are either already dead, severely compromised, or on their way to dying. Cankers, which are discoloured spots or depressed places on the bark, as well as mushrooms growing on the ground at the base of the tree or on the tree itself, are signs that the tree may be infected with fungi or bacteria. These are signs that there is rot in the roots or the trunk of the tree. According to Schaefer, "Over time, the degradation will expand further within the tree, leading to structural difficulties." [Citation needed]
The Tree Shows Signs Of Root Damage.
Because their roots reach so deeply into the earth, it might be difficult to spot any harm that has been done. If you have recently excavated the area around the tree or are in the process of constructing something nearby, keep an eye out for any changes in the tree's health since then that could indicate that the roots were injured in the process. In a similar vein, if your tree has a root system that is shallow and/or partially exposed, you should be on the lookout for subtle changes that could indicate that the vitality of the roots has been impacted by exposure to harsh environmental conditions and inadequate soil compaction. A thinning of the foliage, poor yearly growth, tiny yellow leaves, dead branches, and wilted brown leaves throughout the growing season are some symptoms that the roots of the plant have been damaged.
It Develops A Sudden (Or Gradual) Lean.
According to Schaefer's explanation, "odd growth patterns may suggest general weakness or structural imbalance." [Citation needed] In general, wind or root damage can be identified in the leaning of trees that is greater than 15 degrees from vertical. Large trees that have fallen over as a result of strong winds almost never recover and usually perish over time.
The Tree Fails The Scratch Test.
The cambium layer can be found just beneath the outer layer of bark, which is typically dry. If the tree still has life, the bark will be green; if the tree is dead or dying, the bark will be brown and dry. To examine the cambium layer, carefully peel back a thin slice of the bark on the outside of the tree using your fingernail or a pocket knife. It's possible that you'll need to perform the test in a few different locations across the tree in order to identify whether or not the entire tree is dead or just a few branches.
Frequently Asked Questions
For plants to flourish, they require certain nutrients, which may be obtained through fertilisers, which are an essential component of successful gardening. Various fertilisers are available, and each kind is formulated to deliver a particular advantage to the plant it is applied to.
For instance, products based on phosphorus are helpful in encouraging blooming, while nitrogen-rich fertilisers are typically used to foster the growth of green vegetation.
It is possible to apply fertilisers in various methods, including placing them directly on the soil or absorbing them through the plant's leaves. However, to ensure that you are utilising the product most effectively, it is best to follow the recommendations printed on the fertiliser label.
Your plants will be able to grow stronger and healthier with the help of fertilisers, which will result in rich harvests season after season, provided you take the right care.
There is a widespread misconception that as a tree increases in height, its branches will also do so. On the other hand, this is not the situation. The fact is that tree branches always grow downwards because they are continually being pulled down by gravity.
After some time has passed, the tree's stem will gradually push upwards, gradually pulling the branches along with it. Because this process is lengthy and ongoing, it is sometimes difficult to recognise its effects on a day-to-day basis.
The disparity, on the other hand, may become rather noticeable over the period of several years or even decades. So when you next glance up at a large tree, keep in mind that its branches are not extending upwards into the clouds; rather, they are just adhering to their inherent tendency to develop downwards.
The process of removing the highest branches of a tree is known as "tree topping." It could seem like a decent approach to keep a tree under control, but in reality, it might cause more problems than it solves.
Topping a tree exposes it to the risk of infection by disease and insect infestation. It also increases the likelihood that the tree will produce new growth that is feeble and poorly constructed.
In addition, because the upper branches of the tree are removed in the process of topping, there is a greater potential for the tree to suffer harm as a result of strong winds. As a consequence of this, it is strongly recommended that tree topping be completely avoided if possible.
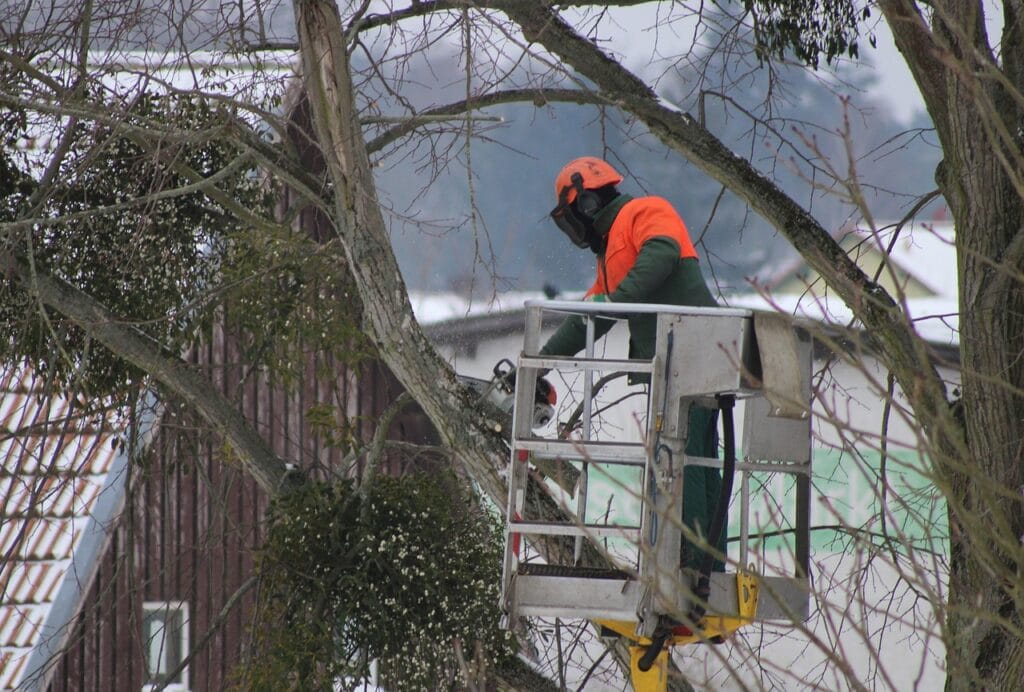
If you are concerned about the size or shape of your tree, however, you should speak with a qualified arborist who can offer advice on how to prune your tree in a secure manner.
There is always an element of danger present while working with power tools, no matter what you're doing. Nevertheless, if you observe all of the necessary safety procedures, trimming trees can be an efficient and risk-free approach to enhance the visual appeal of your yard:
Before using any tools, you should always read the instructions provided by the manufacturer. This will assist you in comprehending how the instrument functions as well as recognising any potential risks.
Before beginning work, work, put on the required protective gear, such as gloves, goggles, and a hard hat. When pruning branches, steer clear of any power wires or other impediments. You can make tree trimming a risk-free activity for you and your trees by paying attention to and adhering to these few basic safety recommendations.
The three-cut technique is a form of tree trimming that is utilised to protect the tree from harm. The process entails making three cuts in the branch as follows: the first cut is made a few inches away from the trunk, the second cut is made a few inches above the first cut, and the third cut is done at the base of the branch.
Through this method, the branch will not separate from the tree's trunk, which would otherwise be detrimental to the plant. When branches are located in close proximity to electricity lines or other structures, the three-cutter approach is frequently used. It is also employed in cases where the branches are unhealthy or out of proportion.
10 Simple Steps On How To Revive A Dead Or Dying Plant
With the assistance of an arborist, it is possible that your tree can be saved even if it is ailing or if only a portion of it is passing away. Determine the nature of the issue first: "Although diseased trees are dangerous, not all of them need to be removed immediately, and certain flaws can be repaired to prolong the life of the tree," It is in your best interest to get in touch with an arborist as soon as you detect even the slightest indication that a tree may be on its way out of this world. An arborist has the education and experience necessary to correctly identify tree issues and provide effective treatment for those issues.
Step 1: Look For Signs Of Life
When discussing vegetation, "dead" is a phrase that is open to interpretation. When you examine your plant more carefully, you can discover that it is still alive despite appearances to the contrary. If there is any green left on the plant, there is a chance that you can still make a profit from it." If there are any traces of green on the stem, it indicates that there is a possibility that it can be brought back to life.
You ought to look at the roots as well. They function as the plant's support system, therefore they offer a wealth of information regarding the plant's general state of health. "Healthy roots should appear plump and be white to tan in colour with white tips," says an agriculture instructor. "In order for any of these tips to work to rescue the world, the roots must still be alive and have a chance to heal."" If you discover any indications of life on the plant, the next step is to determine what went wrong and how to bring the plant back to life.
Step 2: Check If You've Overwatered.
It is possible to provide a plant with an excessive amount of water, as plants are dependent on water for their continued existence and growth. How are you able to tell? Overwatered plants will have wilted leaves that are brown or yellow in colour and will have damp soil. This will have an effect on the roots, which may begin to decay as a result." If you have been providing your plant with an excessive amount of water, you will need to make some adjustments as soon as possible." Stop watering the plant until the soil completely dries out, and then move it out of the direct sunlight. "If the soil is damp, you may want to change the soil and the pot." After that, you should do some additional research. Do some research on your plant to learn how much and how often it likes to be watered, and then make it a point to stick to those guidelines going forwards.
Step 3: Check If You've Underwatered.
In the same way that it is simple to overwater, it is also simple go submerge, and for many people, this is a plausible scenario. What are the telltale indicators of a plant that needs water? Morganthaler observes that the plant will start to wither after this. "The leaf tips will begin to dry out and turn brown, and eventually the entire leaf will turn brown, die, and fall off." Additionally, the dirt will fracture and separate from the perimeter of the container.
Water is the obvious solution to this problem; yet, there is an appropriate way to go about watering a plant that is on its deathbed.
If a plant has been severely underwatered, a quick and easy approach to bring it back to life, according to master gardeners and plant doctors, is to let it soak in water for a few hours. It just takes one day for many plants to transform from being droopy and unhappy to becoming lovely, lush, and perky when you use this strategy! If you're looking for tree removal services, you’re in the right place! Check Tree Amigos!
Step 4: Remove Dead Leaves
It's likely that dying plants may have leaves that have died, and you'll need to get rid of those leaves as soon as possible. Be merciless: if the leaves on a plant have become entirely brown, it means they won't grow back. Instead, you should concentrate on the new growth. Remove them, then either use a pair of plant shears or scissors to cut the dead leaves, or pinch the dead leaves with your fingertips in a gentle manner. In most cases, dead leaves can be removed off the stem without much effort, but if necessary, a pair of shears can be helpful.
Step 5: Trim Back The Stems
The colour green is, of course, desirable. Anything else? The answer is no. To achieve this, you should cut the stems so that they are left with only the green tissue. Remove the dead leaves off the plant and then remove any parts of the stem that are also dead. "In an ideal situation, you want to cut it back to the parts of the plant that are in the best health, but if the stems are dead, then leave at least two inches of them above the earth," the author says.
Altering the soil, or even the container it's in, should be done now as well. At this point, according to Morganthaler, the plant should be repotted in a container or pot that is significantly larger. Be cautioned, though, that you probably won't notice any improvement in your situation immediately away. It may take a few weeks or even longer for the plant to reach a better state of health, but this entirely depends on the plant itself.
Step 6: Look At The Lighting
The sky shall be filled with light—or perhaps not quite so much of it! Because adequate lighting is essential to the well-being of your houseplants, you will want to take the necessary precautions to ensure that each species receives the right amount of light. Once you have determined whether your houseplant thrives best in full sun, moderate sun, direct sunlight, or indirect sunlight, you will be able to relocate it to a location within your home that is better suited to its needs.
If you notice that your plant isn't getting enough light, moving it to a different location may be able to assist. With just this one easy adjustment, a plant that appears to be dead could come back to life much sooner rather than later, depending on its current condition. Your home doesn't get a lot of natural light, does it? Take a look at these low-light houseplants that do well in almost complete darkness.
Step 7: Determine If Your Plant Needs More Humidity.
If your plant originated in the tropics, it may be desperately trying to return to conditions more similar to those in its native habitat. There are several signs that a plant might require more moisture in the air, despite the fact that the level of humidity required varies depending on the type of plant. ""The plant can show signs of shrivelling, browning, and wilting if the humidity is too low," said the expert. If there is a need for extra humidity, you might try routinely spraying your plants or clustering them together to assist boost the humidity.
It should come as no surprise that excessive humidity can be harmful to certain plant species "Mold or mildew, as well as fungal infections and leaves that have turned yellow, can appear on the plant if the humidity is too high. In general, she emphasises that plants with thicker and waxier leaves are better able to endure dry air, which is the scenario in the majority of our homes. However, "while houseplants have been adapted for life indoors and don't necessarily need particularly humid circumstances," most houseplants won't appreciate being next to a heater or air vent because this can be too dry for their comfort. This is because houseplants have been acclimated for life indoors.
Step 8: Provide Additional Nutrients
During the growing seasons of spring and summer, providing adequate nutrition for your plant is of the utmost importance. A plant that is not receiving adequate nutrition will have brittle stems or discoloured leaves; therefore, in order to save a plant that is on its deathbed, you will require compost or fertiliser.
There are two excellent solutions available: Dr. Earth's liquid food, which is made entirely of organic components and does not include any synthetic chemicals; and the brand's all-purpose organic fertiliser, which can be used on any kind of plant. Simply repotting the plant that is perishing can also be of assistance "Because it is possible for soil to lose its nutrient content over the course of time, repotting your plants every few years is always a good idea.
If, on the other hand, your plant is in poor condition, you should get off to a slow start. You should avoid making a number of abrupt adjustments to the plant all at once because the plant is likely to already be in a state of shock and will be more prone to experiencing issues as a result. Maintain the beneficial behaviours you've formed over time." During the growing season, most plants do best when they are given a small amount of fertiliser once or twice a month, on average.
Step 9: Wait At Least A Month.
When it appears that your efforts aren't paying off, it's easy to become discouraged and give up hope. But keep in mind that it took some time to bring your plant to the point where it was almost dead, and it will take some time to nurture it back to health. Being patient is the most important thing. Maintain the care you've been giving your plant over the next two weeks, and then examine the situation. It may take up to a month before you start to see an improvement or new growth on a dying plant after you've taken steps to revive it, so it's important not to lose up on it too quickly after taking those steps.
It is possible that you will first need to perform some troubleshooting in order to determine the precise nature of the issue and, consequently, the appropriate solution; hence, the process may take significantly more time than anticipated. Just so you know, this is what your houseplants would say to you if they could communicate with you. Check this list of affordable Perth Arborist to help you decide which services to choose.
Step 10: Compost It.
If you've done everything you can think of to help your plant, including waiting at least a month, and it still isn't showing any signs of improvement, it's possible that it's time to say goodbye. However, rather than throwing away the plant once it has died, you should put it in a compost bin. Composting your plants, even after they have passed away, can turn their remains into nutrient-dense soil that can be used as a natural fertiliser for your other houseplants or in your garden.
This can be beneficial to both environments. This means that even a plant that has died can be resurrected, which will not only improve the health of your future plants but will also be beneficial to the environment. Have you ever put your hand to composting? The following is a guide for making compost at home. It's not as hard as you might imagine!